3.6 KiB
Importing Haveno into development environment
This document describes how to import Haveno into an integrated development environment (IDE).
Importing Haveno into Eclipse IDE
These steps describe how to import Haveno into Eclipse IDE for development. You can also develop using IntelliJ IDEA or VSCode if you prefer.
Note: Use default values unless specified otherwise.
- If you haven't already, first install and run a Haveno test network.
- Download and run the Eclipse installer.
- Select "Eclipse IDE for Enterprise Java and Web Developers" to install.
- Launch an eclipse workspace and close out of the welcome screen.
- Download the latest version of the lombok jar.
- Run lombok jar, e.g.:
java -jar ~/Downloads/lombok-1.18.22.jar. - Follow prompts to install lombok to your Eclipse installation.
- Restart Eclipse.
- File > Import... > Existing Gradle Project.
- Select the location of "haveno" project, e.g. ~/git/haveno.
- Advance to finish importing haveno project.
- Right click haveno project > Gradle > Refresh Gradle Project.
- File > Import... > Existing Projects into Workspace.
- Select the location of "haveno-ts" project, e.g. ~/git/haveno-ts.
- Advance to finish importing haveno-ts project.
You are now ready to make, run, and test changes to the Haveno project!
Importing Haveno into IntelliJ IDEA
Note: These instructions are outdated and for Bisq.
Most Bisq contributors use IDEA for development. The following instructions have been tested on IDEA 2021.1.
- Follow the instructions in build.md to clone and build Bisq at the command line.
- Open IDEA
- Go to
File -> Settings -> Build, Execution, Deployment -> Compiler -> Annotation Processorsand check theEnable annotation processingoption to enable processing of Lombok annotations (Lombok plugin installed by default since v2020.3) - Go to
File -> New -> Project from Existing Sources...and then select the main Bisq folder to load automatically the related Gradle project - If you did not yet setup JDK11 in IntelliJ, go to
File-> Project Structure -> Projectand under theProject SDKoption locate your JDK11 folder - Select JDK 11 for Gradle as well. Go to
File -> Settings -> Build, Execution, Deployment -> Build Tools -> Gradleand select the JDK11 location for the Gradle JVM value - Go to
Build -> Build Project. Everything should build cleanly - Go to
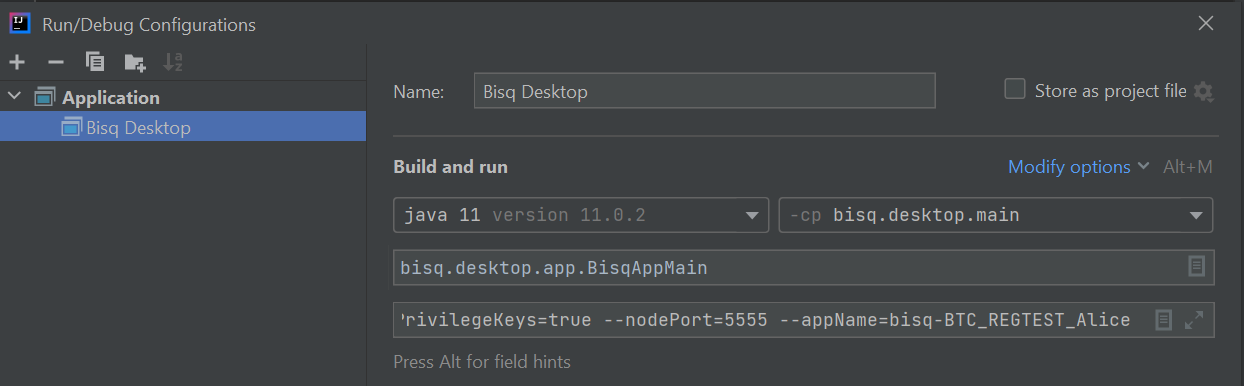
Run > Edit Configurations... -> Plus (+) icon on the top left -> Applicationanf then fill the requested fields as shown below, while using as CLI arguments one of those listed in dev-setup.md:
- Now you should be able to run Bisq by clicking on the Play button or via
Run -> Run 'Bisq Desktop' - If you want to debug the application and execute breakpoints, use
Run -> Debug 'Bisq Desktop'
TIP: If you encounter compilation errors in IDEA related to the
protobuf.*classes, it is probably because you didn't build Bisq at the command line as instructed above. You need to run thegeneratePrototask in theotherproject. You can do this via the Gradle tool window in IDEA, or you can do it the command line with./gradlew :other:generateProto. Once you've done that, runBuild -> Build Projectagain and you should have no errors.If this does not solve the issue, try to execute
./gradlew cleanand then rebuild the project again.