50 KiB
+++ title="Tails for Anarchists" date=2023-04-09
[taxonomies] categories = ["Defensive"] tags = ["intro", "linux", "tails", "easy"]
[extra] blogimage="/images/tails1.png" toc=true dateedit=2023-05-10 a4="tails-a4.pdf" letter="tails-letter.pdf" +++
Tails is an operating system that makes anonymous computer use accessible to anyone. Tails is designed to leave no trace of your activity on your computer, unless you explicitly ask it to. It achieves this by running from a DVD or USB independent of the computer’s installed operating system. Tails comes with several built-in applications pre-configured with security in mind, and all anarchists should know how to use it for secure communication, research, editing, and the publication of sensitive documents.
The documentation on the Tails website is great, and recommended. However, most of our comrades won't read documentation, but will read a zine. This tutorial synthesizes the most relevant documentation, and also has advice on configuration and use specific to an anarchist threat model. Our article Tails Best Practices goes further in this direction, but we recommend that you familiarize yourself with Tails before reading it.
TAILS: The Amnesic & Incognito Live System
Tails is an operating system. Everyone knows about operating systems. You have probably heard of "Windows" or "MacOS". An operating system is the set of programs that runs the different components (hard disk, screen, processor, memory, etc...) of the computer and therefore allows it to function.
Other operating systems exist. Perhaps you have already heard of Linux or Ubuntu? In the Linux family, there is a sub-family called Debian. And in this sub-family, we find Ubuntu and Tails. Tails is a distribution (a version) of Linux with several distinguishing features.
Live System
- Tails is what is referred to as a live system. This means that it is a standalone operating system which is not installed on a computer, but rather on a USB (or even an SD card or a DVD). Whatever operating system you have installed on the hard drive remains untouched. You can even use Tails on a computer without a hard drive.
Amnesia
- Tails is designed to not leave any data behind on the computer you are running; it writes nothing to the hard disk, and runs only in RAM which is wiped after shut down. The Tails live system itself (usually running on a USB) is also left untouched. You can only save information by explictly saving it somewhere before shutting down. The goal of this is to avoid leaving forensic traces that could be read by someone with physical access to either your computer or your Tails USB at a later date. Things like Internet search history, cache, "recently edited" documents, etc., are all erased. The computer itself also has no trace that Tails was ever even used on the computer.
Incognito
- Tails is also a system that allows you to be incognito, meaning anonymous. It hides the elements that could reveal your identity, your location, etc. Tails makes use of the Tor anonymity network to protect your anonymity online: the Tor Browser and all other default software are configured to connect to the Internet through Tor. If an application tries to connect to the Internet directly, the connection is automatically blocked. Tails also changes the so-called "MAC address" of your network hardware, which can be used to uniquely identify your laptop.

Tor Browser features
Security
- Tails is designed with security in mind. A minimal, functional, and verified environment is already installed (with what is required for simple word processing, image processing, etc.). It is bundled with easy-to-use encryption and data deletion tools and protections from common attacks or threats.
Today's digital security will not necessarily be secure tomorrow. Protecting personal data requires updates, and it is important to do them in a timely manner. Digital tools are unreliable if they are never updated, and to have lasting confidence in these tools, it is good to check that teams are maintaining them, that they are reactive, and to know what their reputation is. It is important to understand the spirit of Tails: everything is designed with security in mind. However, in software, there is no such thing as an all-powerful tool; there are always limits (and we will see some of them below). Moreover, the way you use Tails can create security issues.
Tails is free and open-source software. Anyone can consult the source code (the recipe), get it, and modify it... It is absolutely necessary to make sure that the version of Tails in your possession is healthy. Don't neglect the verification steps during the installation which are well-explained on the Tails website.
Tails allows non-experts to benefit from digital security and anonymity without too steep of a learning curve. Tor must be central to digital anonymity and Tails helps us to make as few mistakes as possible when using Tor as well as some other tools. The effort required to change our everyday digital behavior is minimal, even if it seems "inconvenient" to many of us. The "convenient" alternative, on the other hand, means controllability, predictability, manipulability, and increased risk of repression – not only for you, but also for those with whom you communicate.
This tutorial is in several sections. The first is about the basics for starting to use Tails. The second section contains tips on using software included in Tails, as well as what you need to know about how Tor works. The third section is about troubleshooting any issues that you might encounter with your Tails USB to avoid giving up at the first problem - most of the time the solution is simple!
The concept of a threat model
Tails is not magic and has plenty of limitations. The Internet and computers are hostile territory and are based on stealing your data. Tails does not protect you from human error, compromised hardware, compromised firmware, being hacked, or certain other types of attacks. There is no absolutely perfect security on the Internet, hence the interest in being able to make a threat model.
Building a threat model is simply a matter of asking yourself certain questions. Who am I defending against? What are their capacities? What are the consequences if they have access to such data? How can I protect myself?
It makes no sense to say "such and such a tool is secure". Security always depends on the threat model and which level (network, hardware, software, etc.) is being discussed. For more detailed information on this topic, see the Threat Library.
I) The Basics of Using Tails
Prerequisites
Selecting a USB/DVD:
- Tails only works on USBs of more than 8 GB or on DVDs (where it is not possible to use the Persistent Storage feature described below). The data on the USB will be completely erased at installation, so save your data elsewhere beforehand, and if you don't want any trace of what was there before, use a new USB.
- The article Tails Best Practices recommends using a USB with a write-protect switch (an unchangeable data medium) to make sure that nothing is left behind when doing sensitive work, and that the laptop cannot compromise your Tails system. The article details how to adapt to this. The write-protect switch will need to be disabled during installation. If you are unable to obtain such a USB, you can use Tails from a DVD-R/DVD+R, or always boot it with the
toramoption (described at more length in the article).
Selecting a laptop:
- Although it is possible to use Tails on a desktop computer, this is not advised because it is only possible to detect physical tampering on a laptop. Additionally, it would be harder to tell if someone had opened your desktop case and installed a physical keylogger. See Tails Best Practices for more on obtaining a laptop.
Some laptop and some USB models do not work with Tails, or some features will not work. To see whether your model has known issues, consult the Tails known issues page.
If Tails is too slow, make sure that the USB is 3.0 or higher, and using a USB 3.0 port on the laptop. If Tails completely freezes often, it's possible to increase the RAM of your computer. 8 GB will be sufficient.
Installation
To install Tails on a USB, you need a "source" and a USB (that is 8 GB or larger).
Concerning the "source", there are two solutions.
Solution 1: Installation from another Tails USB
- This requires knowing a Tails user you trust. A very straightforward software called the Tails Installer allows you to "clone" a new Tails USB in a few minutes; see the documentation for cloning from a PC or Mac. Any Persistent Storage data isn't transferred. The disadvantage of this method is that it can spread a compromised installation.
Solution 2: Installation by download (Preferred)
- You have to follow the Tails installation guide. The Tails website will guide you step by step; it is important to follow the entire tutorial. It is possible for an attacker to intercept and modify the data on its way to you, so do not skip the verification steps. As discussed in Tails Best Practices, the install method using GnuPG is preferred, because it checks the integrity of the download more thoroughly.
Booting from your Tails USB
Once you have a Tails USB, follow the Tails guides to start Tails on a Mac or PC computer. The Tails USB must be inserted before turning on the laptop. The "Boot Loader" screen will appear and Tails starts automatically after 4 seconds.

After around 30 more seconds of a loading screen, the Welcome Screen appears.

In the Welcome Screen, select your language and keyboard layout in the Language & Region section. For Mac users, there is a keyboard layout for Macintosh. Under "Additional Settings" you will find a + button, click on it and further configuration options will appear:
- Administration Password
- Set this if you need administration rights for a program. For example, this is necessary to install additional software to use during your Tails session. In the following dialog you can write any password (and you must remember it!). It only stays valid for this one Tails session. Dedicate the session to what you need it for, and then reboot without an administration password before doing any other activities.
- MAC Address Spoofing
- We recommend to never disable this. It is enabled by default.
- Network Connection
- With "Disable all networking" you can disable all software network adapters at start-up. If you intend to have an 'offline' Tails session, it makes sense to do this before Tails starts its network functionality.
- Unsafe Browser
- The Unsafe Browser is enabled by default, which doesn't use Tor. An attacker could exploit a vulnerability in another application in Tails to launch an invisible Unsafe Browser and reveal your true IP address. This is possible even if you don't use the Unsafe Browser yourself. For example, an attacker could exploit a vulnerability in Thunderbird by sending you a phishing email that launches an invisible Unsafe Browser which visits a website, revealing your IP address. Such an attack is very unlikely, but it could be carried out by a strong attacker, such as a government or a hacking company. For this reason, we recommend to disable it with every session. It should only be left enabled when establishing an Internet connection requires connecting via a ‘captive portal’ (that is, the type of login page that can be found at many Internet cafés, hotels, etc.).
When you have enabled Persistent Storage, the passphrase to unlock it will appear in this window. If you haven't enabled Persistent Storage, no data will persist on your Tails USB beyond this session. Click Start Tails. After 15 to 30 seconds, the Tails desktop appears."
Using the Tails desktop

Tails is a classic and simple operating system.
- The "Activities" menu. Allows you to see an overview of windows and applications. It also allows you to search through applications, files, and folders. You can also access "Activities" by sending the mouse to the top left corner of your screen or by pressing the Command/Windows (❖) key on the keyboard.
- The Applications menu. Lists available applications (software), classified by theme.
- The Places menu. Shortcuts to different folders and storage media, which can also be accessed with the Files browser (Applications → Accessories → Files).
- Date and time. Once connected to the Internet, all the Tails USBs around the world have the same time.
- The Tor status indicator which tells you if you are connected to the Tor network. If there is an X over the onion icon, you are not connected. You can open the "Onion Circuits" application from here. A Tor connection can be verified by visiting
check.torproject.orgin Tor Browser. - The "Universal Access" button. The Universal Access menu allows you to activate accessibility software like the screen reader, visual keyboard, and large text display.
- Choice of keyboard layouts. An icon that shows the current keyboard layout (in the above example, en for an English layout). Clicking it will provide options for other layouts selected at the Welcome Screen.
- The system menu. You can use this to change screen brightness and the volume, the Wi-Fi and Ethernet connection (if it is connected), the battery status, and the restart and shutdown buttons.
- The "workspaces" icon. This button toggles between multiple views of the desktop (the “workspaces”); this can be helpful to prevent visual crowding on a small screen.
If your laptop is equipped with Wi-Fi but there is no Wi-Fi option in the system menu, see the troubleshooting documentation. Once you connect to Wi-Fi, a Tor Connection assistant appears to help you to connect to the Tor network. Choose Connect to Tor automatically unless you are in a country where you need to hide that you are using Tor (in which case, you'll need to configure a bridge).
Optional: Create and Configure Persistent Storage
Tails is amnesiac by default. It forgets everything you did between sessions. This isn't always what you want - for instance, you may want to work on a document that you can't complete in one sitting. The same is true for installing additional software: you would have to redo the installation after each start-up. Tails has a feature called Persistent Storage, which makes it no longer completely forgetful. This is explicitly less secure, but it is necessary for some activities.
The principle is to create a second storage area (called a partition) on your Tails USB, which is encrypted. This new partition allows a user to persist data – that is, to keep it around – between Tails sessions. It's very simple to enable Persistent Storage. To create the Persistent Storage, choose Applications → Tails → Persistent Storage.
A window opens where you have to type a passphrase; see Tails Best Practices for notes on passphrase strength. You'll then configure what you need to keep in Persistent Storage. Persistent Storage can be enabled for several types of data:
Personal Documents:
- Persistent Folder: Data such as your personal files, documents, or images that you're working on can be saved in the Persistent Storage on the Tails USB.
System Settings:
- Welcome Screen: Settings from the Welcome Screen can be saved in the Persistent Storage: language, keyboard, and additional settings.
- Printers: Printer configuration can be saved in the Persistent Storage.
Network:
- Network Connections: The passwords for Wi-Fi networks can be saved in the Persistent Storage, so you don't have to type them every time.
- Tor Bridge: When the Tor Bridge feature is turned on (for users in countries that censor Tor), the last Tor Bridge that you used is saved in the Persistent Storage.
Applications:
- Tor Browser Bookmarks: Tor Browser bookmarks can be saved in the Persistent Storage.
- Electrum Bitcoin Wallet: The bitcoin wallet and preferences can be saved in the Persistent Storage.
- Thunderbird Email Client: The email inbox, feeds, and OpenPGP keys of Thunderbird can be saved in the Persistent Storage.
- GnuPG: The OpenPGP keys that you create or import into GnuPG and Kleopatra can be saved in the Persistent Storage.
- Pidgin: The account files of this chat application (using the XMPP protocol) can be saved in the Persistent Storage.
- SSH Client: SSH is used to connect to servers. All files related to SSH can be saved in the Persistent Storage.
Advanced Settings:
- Additional Software: With this feature enabled, a list of additional software of your choice is automatically installed every time you start Tails. The corresponding software packages are stored in the Persistent Storage. They are automatically upgraded after a network connection is established. Be careful with what you install.
- Dotfiles: On Tails and Linux in general, the name of configuration files often starts with a dot and are sometimes called "dotfiles" for this reason. These can be saved in the Persistent Storage. Be careful about what configuration settings you change, because altering default settings can break your anonymity.
Persistent Storage must be unlocked at the Welcome Screen to use it. If you want to change the passphrase, see the documentation. If you ever forget the passphrase, it is impossible to recover it; you'll need to delete the Persistent Storage and start again.
In Tails Best Practices, we recommend against using Persistent Storage in most cases. Any files that need to persist can instead be saved to a second LUKS-encrypted USB. Most Persistent Storage features do not work well with USBs that have a write-protect switch.
Upgrading the Tails USB
The security of Tails (and more generally of Linux) depends on the continuous development of the operating system and the resolution of any security flaws through upgrades. It is important to always use the latest version (Tails is updated approximately every month) because security vulnerabilities are regularly discovered in the programs used by Tails, which in the worst case scenario can lead to your identity, IP address, etc., being revealed. A Tails upgrade will patch these security holes and usually enhance other features as well.
Every time you start Tails, the Tails Upgrader checks if you are using the latest Tails version right after you connect to the Tor network. There are 2 types of upgrades.

The automatic upgrade
- A window will appear with information about the upgrade, and you have to click Upgrade now. You have to wait a little while for it to complete, and for a moment it will cut your Internet. Do not shut down before you see the Restart Tails window. If the upgrade fails (for instance, because it shut down before it was finished), your Persistent Storage is not affected, but you may not be able to restart your Tails USB. If you are using a USB with a write-protect switch, you will have to set it to "writable" for the single session in which you are performing the upgrade.
The manual upgrade
- Sometimes the upgrade window will tell you that you need to do a manual upgrade. This type of upgrade is only done for major upgrades or in case of an issue.
- If you already have a second Tails USB with the latest version, you start on that one, and navigate to Applications → Tails → Tails Installer. Instead of the button reading "install", you'll be asked "upgrade". The difference is that it won't format the whole USB, it will just replace the Tails partition with an updated version.
- If you don't have a second Tails USB with the latest version, you'll need a blank USB and the (out of date) Tails USB. See the documentation for manual upgrades.
II) Going Further: Several Tips and Explanations
Tor
What is Tor?
Tor stands for The Onion Router, and is the best way to be anonymous on the Internet. Tor is an open-source software associated with a public network of several thousand relays (servers). Instead of connecting directly to a location on the Internet, Tor will take a detour via three intermediate relays. Tor Browser uses Tor, but other applications can too if they are properly configured. All applications included by default in Tails that connect to the Internet use Tor.

Internet traffic, including the IP address of the final destination, is encrypted in different layers like an onion. With each hop along the three relays, an encryption layer is removed. Each relay only knows the step before it, and after it (relay #3 knows that it comes from relay #2 and that it goes to such and such a website after, but does not know relay #1).
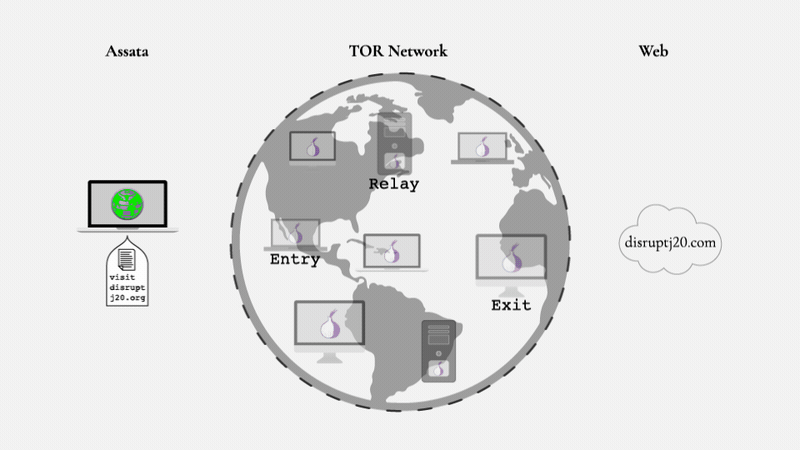
This means that any intermediaries between you and relay #1 know you're using Tor but they don't know what site you're going to. Any intermediaries after relay #3 know that someone in the world is going to this site. The web server of the site sees you coming from the IP address of relay #3.
Tor has multiple limitations. For example, an entity with the appropriate technical and legal means can, if it assumes you're connecting from a specific Wi-Fi connection to post to a specific site, try to match what comes out of your connection to what goes into the site (a "correlation attack"). However, this type of attack has never been used to incriminate someone in court by itself, to our knowledge. For sensitive activities, use Internet connections that are not tied to your identity in order to protect yourself in the scenario that Tor is not perfect.
What is HTTPS?
Virtually all websites today use HTTPS; the S stands for "secure" (for example, https://www.anarsec.guide). If you try to visit a website without http:// on Tor Browser, there is a warning message before continuing. If you see http:// instead of https:// before the address of a website, it means that all intermediaries after relay #3 of the Tor network know what you are exchanging with the website (including your log-in information). HTTPS means that the digital records of what you do on the site you are visiting is protected with an encryption key that belongs to the site. Intermediaries after relay #3 will know that you are going to riseup.net, for example, but they will not have access to your emails and passwords nor will they know if you are consulting your emails or if you are reading a random page on the site. A little padlock appears to the left of the site address when you use HTTPS.
If there is a yellow warning on the padlock, it means that, in the page you're browsing, some elements are not encrypted (they use HTTP), which can reveal the exact page you're browsing or allow intermediaries to partially modify the page. By default, Tor Browser uses HTTPS-Only Mode to prevent visiting HTTP websites.

HTTPS is essential both to limit your web fingerprint, but also to prevent an intermediary from modifying the data you exchange with websites. If the intermediary cannot decrypt the data, they cannot modify it. For an overview of HTTP / HTTPS connections with and without Tor, and what information is visible to various third parties, see the EFF's interactive illustration.
In short, don't visit websites that don't use HTTPS.
Onion Services: what is .onion?
Perhaps you have seen a strange site address containing 56 random characters, ending in .onion? This is called an onion service, and the only way to visit a website that uses such an address is to use the Tor Browser. The "deepweb" and "darkweb" are terms popularized in news media in recent years to describe these onion services.

Anyone can create an .onion site. But why would they want to? Well, the server location is anonymized, so authorities cannot find out where the website is hosted in order to take it down. When you send data to an .onion site, after the standard Tor circuit you enter the site's three Tor relays. So we have 6 Tor relays between us and the site; we know the first 3 relays, the site knows the last 3, and each Tor node just knows the relay before and after. Unlike an HTTPS normal website, it's all Tor encryption from end to end.
This means that both the client (your laptop) and the server (where the site lives) remain anonymous, whereas for a normal website, only the client is anonymous. In addition to being more anonymous for the server, it is also more anonymous for the client: you never leave the Tor network, so there is no possibility of interception after relay #3.
The .onion site address is so long because it includes the site's certificate. HTTPS is unnecessary; security depends on knowing the site's .onion address.
Some sites offer both a classic URL as well as an .onion address. In this case, if the site has been configured for it, an indication ".onion available" should appear. If not, sometimes the site indicates the .onion address somewhere on its page. To find out the addresses of sites which are only available as .onion, you have to either get them by word of mouth, or through websites that list other .onion sites, such as this GitHub page.
Sites that block Tor
The Tor network is blocked and otherwise rendered more inconvenient to use in many ways. You may be confronted with CAPTCHA images (a kind of game that verifies you “are not a robot”) or obliged to provide additional personal data (ID card, phone number…) before proceeding, or Tor may be completely blocked.

Perhaps only certain Tor relays are blocked. In this case, you can change the Tor exit nodes for this site: click on the ≣ → "New Tor circuit for this site". The Tor circuit (path) will only change for the one tab. You may have to do this several times in a row if you're unlucky enough to run into several relays that have been banned.
It is also possible that the entire Tor network is blocked, because all Tor relays are public. In this case you can try to use a proxy to get to the site, such as https://hide.me/en/proxy (but only if you don't have to enter any personal data or do anything sensitive like login information). You can also check whether the page you want to access has been saved to the Wayback Machine: web.archive.org.
Separate Anonymous Identities Cleanly
It is not recommended to perform different tasks on the Internet that should not be associated with each other during the same Tails session. You have to separate different (contextual) identities carefully! For example, it is dangerous to check your personal emails via Tor Browser and to publish an anonymous text during the same session. That is, you should not be identifiable and anonymous on the Tor network at the same time. You also shouldn't use the Tor network under pseudonym A and pseudonym B in the same session, because these pseudonyms could be connected to each other on a monitored or compromised Tor exit relay. Shut down and restart Tails between Internet activities of different identities!
The 'New Identity' feature of Tor Browser is not sufficient to completely separate contextual identities in Tails, since connections outside the Tor Browser are not restarted and you retain the same Tor entrance node. Restarting Tails is a better solution.

The Onion Circuits application shows which Tor circuit a connection to a server uses (website or otherwise). Sometimes, it can be useful to make sure that the exit relay is not located in a certain country, to be further away from the easiest access of investigating authorities. In the example above, the connection to check.torproject.org goes through the relays tor7kryptonit, Casper03, and the exit node blackfish. If you click on a circuit, technical details about the relays of the circuit appear in the right pane. The 'New Identity' feature of Tor Browser is useful for changing this exit relay without needing to reboot the Tails session, which can be repeated until you have an exit relay you are happy with. We are not suggesting to use 'New Identity' when switching between identities, but simply when you want to change the exit node within a single identity's activity.
Tor Browser security settings

Like any software, Tor Browser has vulnerabilities that can be exploited. To limit this, it's important to keep Tails up to date, and it's also recommended to increase the security settings of the Tor browser: you click on the shield icon and then Change. By default it's set to Standard, which is a browsing quality that hardly changes from a normal browser. We recommend that you set the most restrictive setting before starting any browsing: Safest.
The layout of some sites may be modified, and some types of content will be disabled (SVG images, videos are click-to-play, etc.). For example, this website has two things which will be blocked on Safest mode because they rely on Javascript: dark mode, and the Table of Contents. Some sites will not work at all with these restrictions; if you have reason to trust them, you can view them on a less restrictive setting on a site by site basis. Note that both of the less restrictive setting allow scripts to function, which can break your anonymity in a worst-case scenario.
Downloading/uploading and the Tor Browser folder
The Tor Browser on Tails is kept in a "sandbox" to prevent it from being able to snoop on all your files, just in case it is comprised by a malicious website. This means there are special considerations for uploading or downloading files with the Tor Browser.
Downloads
When you download something using the Tor Browser it will be saved in the Tor Browser folder (/home/amnesia/Tor Browser/), which is inside the "sandbox". If you want to do anything with this file, you should then move it out of the Tor Browser folder. You can use the file manager (Applications → Accessories → Files) to do this.

Uploads
Similarly, if you want to upload something using the Tor Browser (for example attaching a file to a blog post or email you have open in the browser), you will first have to move or copy that file into the Tor Browser folder. Then it will be available to you when you go to select an upload in the Tor Browser.
RAM
Be aware that, because all of your Tails session is running in RAM (unless you have set up Persistent Storage), if you are downloading or otherwise working with very large files, your RAM may fill up. This will cause Tails to slow down or glitch. You can mitigate this by closing unneeded applications and deleting other files you have downloaded. In the worst case, you may need to enable Persistent Storage and move large files to the persistent Tor Browser folder so they will no longer use up RAM.
Share Files with Onionshare

It is possible to send a document through an .onion link thanks to OnionShare (Applications → Internet → OnionShare). Normally, OnionShare stops the hidden service after the files have been downloaded once. If you want to offer the files for multiple downloads, you need to go to Settings and unselect "Stop sharing after first download". As soon as you close OnionShare, cut the Internet connection, or shut down Tails, the files can no longer be accessed. This is a great way of sharing files because it doesn't require plugging a USB into someone else's computer, which is not recommended. The long .onion address can be shared via another channel (like a Riseup Pad you create that is easier to type).
Make Correlation Attacks More Difficult
When you request a web page through a web browser, it is transmitted to you in small "packets" characterized by a specific size and timing (alongside other characteristics). When using Tor Browser, the sequence of transmitted packets can also be analyzed and assigned certain patterns. The patterns here can be matched with those of monitored websites on the Internet. To make this "correlation attack" more difficult, before connecting to a sensitive website you can open various other pages that require loading (such as streaming videos on a privacy-friendly website like kolektiva.media) in additional tabs of your browser. This is officiallly recommended by Tor - see Do multiple things at once with your Tor client. This will generate a lot of additional traffic, which will make the analysis of your pattern more difficult.
Included Software
Tails includes many applications by default. The documentation gives an overview of Internet applications, applications for encryption and privacy, as well as applications for working on sensitive documents. In the rest of this section, we will just highlight common use cases relevant to anarchists, but read the documentation for further information.
Password Manager (KeePassXC)
If you're going to need to know a lot of passwords, it can be nice to have a secure way to store them (i.e. not a piece of paper next to your computer). KeePassXC is a password manager included in Tails (Application → Favorites → KeePassXC) which allows you to store your passwords in a file and protect them with a single master password. In the terminology used by KeePassXC, a password is a randomized sequence of characters (letters, numbers, and other symbols), whereas a passphrase is a random series of words.

When you create a new KeePassXC database, in the Encryption settings window, increase the Decryption time from the default to the maximum (5 seconds). Then, select a strong passphrase and then save your KeePassXC file. This file will contain all your passwords/passphrases, and needs to persist between sessions on your Persistent Storage or on a second LUKS-encrypted USB as described in Tails Best Practices. The decryption time setting of a pre-existing KeePassXC file can be updated: Database → Database Security → Encryption Settings.
As soon as you close KeePassXC, or if you don't use it for a few minutes, it will lock. Be careful not to forget your main passphrase. We recommend against using the auto-fill feature, because it is easy to fill your password into the wrong window by mistake.

- Right-click on a folder to add sub-groups
- Create a new entry
- Copy the username
- Copy the password

- Use the Password Generator when editing an entry
Really delete data from a USB
"Permanently delete" or "trash" does not delete data... and it can be very easy to recover. Indeed, when you "delete" a file, you are only telling the operating system that the contents of this file are no longer of interest to you. It then deletes its entry in the index of existing files. It can then reuse the space that the data took up to write something else.
However, it may be weeks or years before that space is actually used for new files, which is when the old data actually disappears. In the meantime, if you look directly at what is written to the drive, you can find the contents of the files. This is a fairly simple operation, automated by many software programs that allow you to "recover" or "restore" data. One cannot really delete data, however one can "overwrite data", which is a partial solution.
There are two types of storage; magnetic storage (HDD) and flash storage (SSD, NVMe, USB, memory cards, etc.). The Wipe feature on Tails is not effective on USB storage. The only way to delete a file on a USB is to format the entire USB, and select Overwrite existing data with zeros. Doing it twice is a good idea.
However, traces of the previously written data may still remain. If you have sensitive documents that you really want to delete, it is best to physically destroy the USB after reformatting it. Thankfully, USBs are either cheap or easy to steal. Make sure to still reformat the drive before destroying it; destroying a drive is also often a partial solution. Data can still be retrieved from disk fragments, and burning a drive requires temperatures higher than a normal fire (i.e. thermite).
- For flash memory drives (USBs, SSD, SD cards, etc.), use two pliers to break the circuit board out of the housing, then break the memory chips, including the circuit board, into pieces (beware of splintering). Hold the pieces in the flame of a camping gas torch. You will only achieve a partial decomposition of the transistor material. Use sufficient respiratory protection or distance! The fumes are unhealthy.
- If burning the pieces is too involved, discretely dropping them down a storm drain while you tie your shoe would make recovery unlikely.
How to create an encrypted USB
Exclusively store data on encrypted drives. This is necessary for using a separate LUKS USB instead of Persistent Storage on the Tails USB. LUKS is the Linux encryption standard. To encrypt a new USB, go to Applications → Utilities → Disks.
- When you insert the USB, a new "device" should appear in the list. Select it, and verify that the description (brand, name, size) matches your device. Be careful not to make a mistake!
- Format it by clicking ≣ → Format the disk.
- Select Overwrite existing data with zeroes in the Erase drop-down list. Keep in mind that this is likely incomplete if there were sensitive documents on the USB.
- Choose Compatible with all systems and devices (MBR/DOS) in the Partitioning drop-down list.
- Then click Format…
![]()
- Now you must add the encrypted partition.
- Click on the "+"
- Choose the size of your partition (all free space)
- For "type" select internal disk to be used with Linux systems only (Ext4); check Password protected volume (LUKS)
- Enter a strong passphrase
When you insert an encrypted USB, it will not be opened automatically but only when you select it in the Places menu. You will be prompted to enter the passphrase. Before you can remove the disk when the work is done, you have to right-click on it under Places → Computer and then select Eject.
Encrypt a file with a password or with a public key
In Tails, you can use the Kleopatra application to encrypt a file with a password or a public PGP key. This will create a .pgp file. If you are going to encrypt a file, do so in RAM before you store it on a LUKS USB. Once the unencrypted version of a file is on a USB, the USB must be reformatted to remove it.
If you choose the passphrase option, you will have to open the file in Tails and type the passphrase. If you don't want the unencrypted data to be stored in the location where you saved it (e.g. on a USB), it's best to first copy the encrypted file to a Tails folder that is only in RAM (e.g. Places → Documents) before decrypting it.
Adding administration rights
In Tails, an administration password (also called a "root" password) is required to perform system administration tasks. For example:
- To install additional software
- To access the computer's internal hard drives
- To run commands in the root terminal
- To access certain permissions, such as when you have a window that asks for administration authentication
By default, the administration password is disabled for more security. This can prevent an attacker with physical or remote access to your Tails system from gaining administration privileges. Also, if you set an administration password for your session, you create another vector to potentially bypass Tails security.
To set an administration password, you must choose an administration password at the Welcome Screen when starting Tails. This password only lasts for the duration of the session.
Installing additional software
If you install new software, it's up to you to make sure it is secure. Tails forces all software to connect to the internet through Tor, so you make need to use a program called torsocks from Terminal to start additional software that requires an Internet connection (for example, torsocks --isolate mumble). The software used in Tails is audited for security, but this may not be the case for what you install. Before installing new software, it's best to make sure there isn't already software in Tails that does the job you want to do. If you want additional software to persist beyond a single session, you have to enable "Additional Software" in Persistent Storage configuration.
To install software from the Debian software repository:
- Start Tails with administration rights, then go to Applications → System Tools → Synaptic Package Manager.
- When prompted, enter your administration password (if it's the first time you do this, it will take time to download the repositories).
- Go to "All" and choose the software you want to install: "select for installation", then "apply".
- Once done, Tails will ask you, if your Persistent Storage is open, if you want to install it once, or add it to your Persistent Storage. If you add it to the Persistent Storage, the corresponding software files are saved there. They are automatically updated for security reasons as soon as a network connection is established.
- You will be able to access the additional software you have installed, with the option to remove them, in Applications → System Tools → Additional Software.
For more information, see the documentation on Installing additional software.
Remember to make backups!
A Tails USB is easily lost and USBs have a much shorter life span than a hard drive (especially the cheap ones). If you put important data on it, think about making regular backups. If you use a second LUKS-encrypted USB, this is as simple as using the File Manager to copy files to a backup LUKS-encrypted USB.
If you use Persistent Storage, see the documentation on backing it up.
Privacy screen
A privacy screen can be added on top of the laptop screen to prevent people (or hidden cameras) from seeing the content unless they are directly facing it.
III) Troubleshooting Issues
The computer tries to boot on the USB but it doesn't work
Check the error messages displayed (for example, if you have an old computer with 32-bit architecture, it won't work on Tails). If it says Error starting GDM with your graphics card, the issue is with the graphics card; check the documentation for Known issues with graphics cards. You can also check the list of known issues on the Tails site for your computer model.
If the Tails Boot Loader page displays, try booting to "Tails troubleshooting mode".
My Tails USB doesn't want to start anymore! (and it was starting before on the same computer)
Following an upgrade, or otherwise, Tails does not start anymore on your computer. You have three options:
- See if the Tails news page mentions any problems about the upgrade.
- Do a manual upgrade, which may be necessary if the computer was turned off before the end of the upgrade.
- If the first two solutions don't work, the USB is too old, it is of bad quality or it has been mistreated. If you have data on Persistent Storage to recover, plug this USB into a Tails session that is using another USB. It will appear as a normal USB that you have to unlock with your password. If you can't access your data on another Tails USB where you had Persistent Storage enabled, your USB may be dead.
I can't connect to a public Wi-Fi network with an authentication page (a captive portal)
If you must connect to Wi-Fi using a captive portal, Unsafe Browser needs to be enabled. Connect to the Wi-Fi, then you open Applications → Internet → Unsafe Browser. You type a URL of a site that isn't sketchy to access the authentication page. Once you've put in the login, you wait for Tor to be ready to go to your Tor Browser, then close the unsafe browser.
I have no more free space on a USB?
If you have no more space on a USB or if there is less data indicated than actually present on your USB, in the Files browser you enable "Show hidden files". There you will have new files named .something. The file .Trash-10xx is your trash (and if you put in the trash it will be completely removed). Don't change other hidden files.
A file always opens in read-only or does not open?
In some programs, this is normal if the same file is already open. If this isn't the case, use the same trick as the paragraph above. You enable Show hidden files. There will be a .lock file with the same name as the file you have an issue with. Delete this file which indicates that it is already open elsewhere. If that's not the issue, you have to change the permission rights of the document.
I can't install Tails on a USB
Check that your USB is not known to have issues on Tails. Format the entire USB and try to restart the installation.
An application makes Tails slow down? The screen is glitching?
Try pressing the Windows key, or the Cmd key for Mac, which will open the window with all your running applications. You can turn off applications by pressing the little cross. If pressing this key doesn't work, you must forcefully shut down by holding the power button.
Add a printer
You go to: Applications → System Tools → Settings → Devices → Printers → "+" → Add a printer. Some printer models may not work (or work with difficulty) with Tails.
Unable to install new software
It has happened that the Synaptic Package Manager refused to install software. In that case, the solution had been to go through a root terminal (which requires an administration password): installation by the command apt update && apt install [package_name]
Best Practices
Tails Best Practices are important to establish before using Tails for highly sensitive activities. To avoid overwhelming yourself, get acquainted with using Tails in a basic way first; perhaps to read anarchist websites, or to write texts. See the Tails tag for tutorials on subjects like removing identifying metadata from files.
This article is heavily modified from TuTORiel Tails (in French), and also includes some excerpts from Capulcu #1 (German).